Thursday, September 30, 2010

Nini's Crispy Cheese Crackers

Nini's Crispy Cheese Crackers


My grandmother, Nini, makes these yummy homemade cheese crackers every Christmas.  It is a tradition in our family.  Amidst all the sweets, it's nice to have something savory on which to snack.  I always enjoyed eating these cheese crackers and homemade chex mix late at night while watching old Christmas movies like "It's a Wonderful Life."  When I eat these crackers I actually think about that famous line, "every time a bell rings, an angel gets his wings".  I don't know how theologically sound that is, but it makes me smile when I think about it.  That movie holds special meaning to me for several reasons, but I will have to expound on another day.  Back to the cheese crackers.  They also make a great addition to cheese and wine.  They taste like cheese straws, but the addition of Rice Krispies makes them crunchy!  Nini's recipe uses a shake of cayenne pepper which is awesome but I have been on a Tabasco kick lately so I substituted and these turned out really well.  You can choose your poison. :)

Nini is a wonderful cook who still makes our cornbread dressing each Thanksgiving for the entire extended family.  There is nothing like traditional, southern cornbread and nobody makes it better than Nini.  She actually got her name from me. :)  I am the first grandchild on my Dad's side of the family and everyone tried to get me to say "granny."  All I could say was "nee-nee" hence her new name.  (Maybe I was a little slow as a toddler.)  I can't imagine her with any other name.  I love her very much and am happy to share one of her many delicious recipes with you.


Nini's Cheese Crackers

2 sticks butter
2 cups grated sharp cheddar cheese
2 cups flour, sifted
2 cups Rice Krispie cereal
1 teaspoon salt
Tabasco Sauce to taste

Allow the butter and cheese to come to room temperature.  Cream the butter and cheese together in a large mixing bowl.  Add several shakes of Tabasco sauce.  Add flour and salt and continue to mix until combined. 

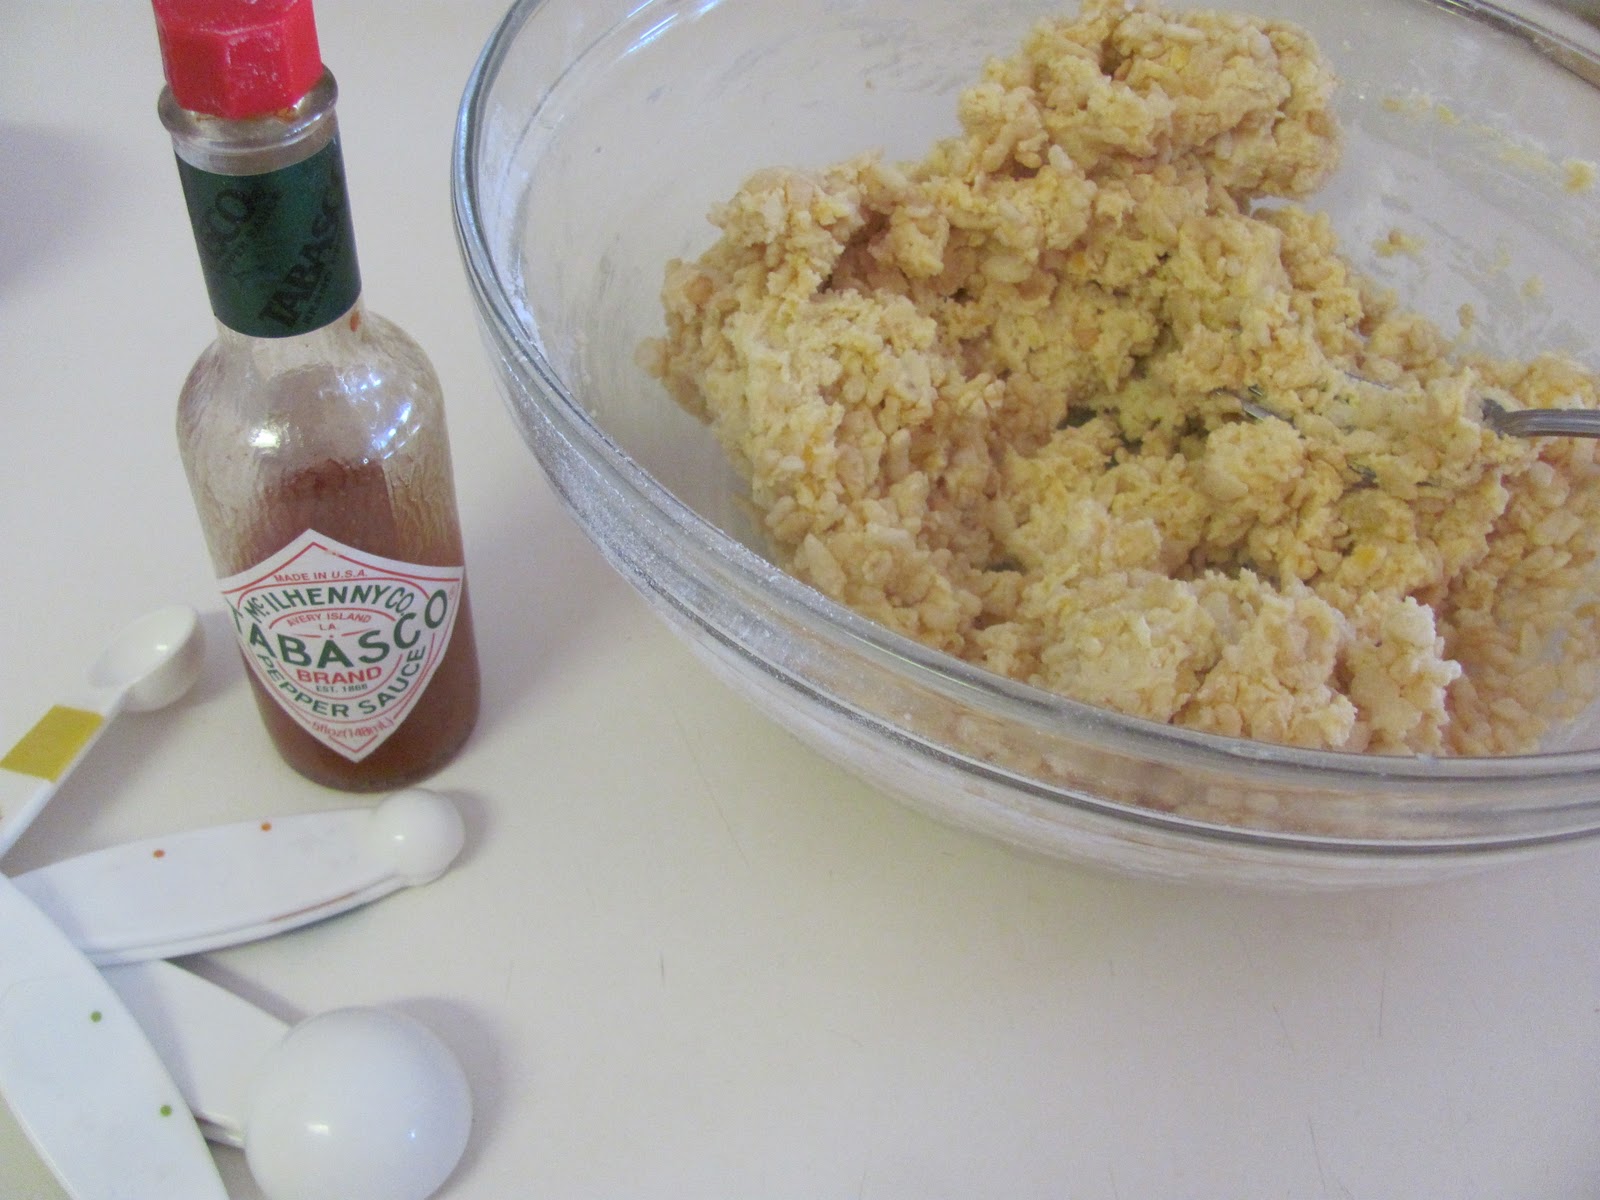
Taste a little dough...is it hot enough?  If not, add a few more shakes of Tabasco.  Add the Rice Krispie cereal and mix until just combined.  Roll the dough into quarter size balls and press them flat on a cookie sheet using the back of the fork.  Bake at 350 degrees F for 10-15 minutes or until crispy and golden.

Saturday, September 25, 2010

Chocolate Almond Caramel Corn

Chocolate Almond Caramel Corn


Crunchy, sweet, a little salty and then you add the chocolate.  I had a craving for "moose munch."  You know, the caramel corn made by Harry and David.  It's so good but I rarely ever buy it because I will eat the whole thing in one sitting.  And it is a little expensive.  I have to admit, it's worth the price, but yesterday I had a whim.  I started thinking how fun it would be to make my own.  Yes, this is the talk of a crazy foodie who sits around thinking about recreating recipes that are readily available at the store.  I am sure it would be simpler to go buy a bag, but not near as fun!


A big bowl for guests!


So, I will walk you through the simple steps of making my Chocolate Almond Caramel Corn.  The best part is that it's fairly inexpensive to make.  It makes a large batch which would be perfect for a holiday party, guests in town or even better, pour into little glassine bags and tie with ribbons for a great teacher gift.  I think I'll make "trick or treat" bags for friends and neighbors.

Individual bags of my Chocolate Caramel Corn


This is a two step process- first you make the caramel corn.  Next you add chocolate.  The caramel corn is good enough to eat on it's own.  The chocolate is just an added bonus.  I added almonds.  You can use almonds or pecans or peanuts or macadamia nuts.  I chose dark chocolate.  You might choose white chocolate or milk chocolate.  The combinations are endless.  I think white chocolate, almonds and dried cherries would be good.  But my favorite will always be dark chocolate with almonds.  It may be difficult to have the kids help with making the caramel corn, but they could certainly help with the chocolate, if you don't mind messy fingers!  So, good luck and enjoy.  Be careful, though, it's really hard to stop eating!


Chocolate Almond Caramel Corn

1 cup butter
1/2 cup corn syrup
1/2 tsp baking soda
2 cups brown sugar
1 tsp salt
1 tsp vanilla
6 cups of popped corn (about 3 bags- I used kettle corn)
1 cup roasted, salted almonds
6 oz good quality chocolate (I like Scharffen Berger semi-sweet bar)


Preheat your oven to 250F. You will need two cake pans or one large 1/2 sheet pan for slow cooking the caramel corn.  Pop the corn and pour the bags into a large bowl.  Shake the bowl to release any unpopped kernels.  Most of these will fall to the bottom of the bowl.  Scoop out the popped corn and lay it in the pan. Sprinkle the cup of almonds evenly over the corn.

Next,  melt the butter on the stove over medium heat.  Stir in the corn syrup, sugar and salt. Bring the mixture to a boil stirring constantly. Boil without stirring for 3-4 minutes.  (The original recipe said you should let boil for 5 minutes.  I tried it twice and both times 5 minutes would have been too long.  My caramel would have burned.  You want a nice rich caramel color- not dark brown. So watch carefully.)


Remove from the heat, stir in the soda and vanilla (Careful, it foams!). Pour over the popped corn and mix well. The caramel is very hot.  You'll be tempted to use your fingers, DON'T!  Use a spatula.  The caramel will melt and coat the popcorn more evenly as it bakes in the oven. Bake for 40 minutes, stirring every 10 minutes. Let it cool.


In a small bowl, melt the chocolate.  You can melt chocolate in the microwave if you heat in 20-30 second intervals, stirring in between.  Over heating chocolate will make it seize up into a ball.  I used a high quality bar chocolate because it doesn't have the stabilizers in it like chocolate chips.  I think it melts better.  In fact, heat just one square first.  When it is melted, add the rest of the chocolate.  This will help temper the chocolate. 


Next, take chunks of the caramel corn and place in a small dish (approximately 2 cups worth).  Pour the melted chocolate over the caramel corn and stir until completely coated. Lay the chocolate chunks out on wax paper and leave in a cool, dry place to harden.  It make take several hours.  It is so humid in Houston that I had to refrigerate to speed the process.


When completely hardened, mix it with the big batch of caramel corn and store in an air tight container.  In theory, it should last for a couple of weeks, but you know, once you start it's really hard to stop!


Thursday, September 23, 2010

Chicken Soup with Wild Rice and Roasted Vegetables

Homemade Chicken and Wild Rice Soup


Just finished the last of my homemade chicken soup.  It was so good!  This recipe would go great with the cheddar biscuits I posted last week.  Yum!  Good, old-fashioned comfort food tastes good anytime but especially as the weather turns colder.  Now that may take awhile here in Texas, but for some of you (you know who you are and you know that I envy you very much), cool days are already creeping up on you.  So, light that fire (or crank down that air conditioning) and enjoy some yummy soup.

Chopped onions, carrots, celery, mushrooms and squash ready for roasting.


I think part of what makes this recipe so delicious is the flavor that comes from roasting the veggies.  Although you can always just throw them in the pot and let them simmer in the broth, I encourage you to take this extra step.  You can eliminate or add vegetables according to taste.  I used up some of my summer squash and it tasted great in the soup.  Consider some winter vegetables as the seasons change.  After our lesson on butternut squash last week, we all should be comfortable hacking into one and using it in place of the summer squash.  Or maybe parsnips or fennel?   The flavor and even the color of the soup changes slightly with each additional vegetable, which can be a wonderful thing.  You can enjoy complex layers of flavor, so  be creative. 

One last thing.  Many times I take recipes and change them, adding or taking away to make it my own.  I encourage you to try the same.  For example, the recipe I found called for plain wild rice.  I chose a flavored option of Near East brand rice.  I knew the flavor of the rice would mix well with the spices in the soup.  You can choose either way.


Chicken Soup with Wild Rice and Roasted Vegetables

1/2 cup wild rice, rinsed and drained (or box of flavored wild rice)
2 cups water
1 medium onion
4 medium carrots, peeled and cut into small pieces
1 red sweet pepper, diced
1 small package of mushrooms, chopped
2 stalks of celery, diced
1 medium summer squash, diced (or try a winter vegetable substitute)
3 cloves of garlic, finely chopped
2 Tablespoons olive oil
1/2 teaspoon kosher salt
1/2 teaspoon ground black pepper
8 cups chicken stock (homemade or good store-bought organic)
2-2 1/2 lbs. meaty chicken pieces (breast halves or thighs)
1 can whole peeled tomatoes, chopped (I like Contadina)
2 tsp fresh thyme
1 Tablespoon chopped fresh parsley
3-4 shakes of Tabasco  sauce, optional

STEP 1:  In a medium saucepan, combine the wild rice and water.  Bring to a boil and reduce heat.  Simmer, covered for 35-40 minutes or until rice is tender.  Drain and set aside.  Remember, you can substitute with a box of flavored wild rice.  Just follow directions on the package.

STEP 2: Combine all the chopped vegetable on a large roasting pan.  Add the chopped garlic, olive oil, salt and pepper.  Toss with your hands to coat.  Roast, uncovered in a 425 degree F oven for 30 minutes or until vegetables are browned and just tender.  Remove from oven and let cool.

STEP 3: In a large pot, combine chicken stock and chicken pieces.  Bring to a boil and then reduce heat.  Simmer, covered for 25-20 minutes or until chicken is tender. 

Steps 1, 2 and 3 can be cooking simultaneously to save time!

Remove chicken from stock and when it is cool enough to handle remove meat from the bones.  Discard skin and bones, and make sure meat is shredded or chopped into bite-size pieces.  Return meat to the stock,  Add the roasted vegetables, wild rice, tomatoes thyme and parsley.  Give a few shakes of Tabasco sauce for heat and flavor.  Season with additional salt to taste.  Simmer for 10 minutes and serve.

Tuesday, September 21, 2010

Pumpkin Streusel Muffins

Pumpkin Streusel Muffins


My whole house smells delicious.  The scent of pumpkin and cinnamon is in the air and this time it's not because of the candles I have lit all over the house.  Tonight I made Pumpkin Streusel muffins and the kids are devouring them for an after dinner dessert.  I actually made them for breakfast tomorrow but when the kitchen is filled with the aroma of fresh baked muffins, it's kind of hard to hide them.  So, the compromise is everyone only gets one tonight. 

My middle child just finished his and said, "This is the best dessert I've ever had."  Wow.  I was considering the muffins a special breakfast treat.  But they do make a great snack or easy dessert.  The crumbly streusel topping is crunchy but the pumpkin muffin is moist.  I am trying to be good but I had to taste test just one.  It's only right! 

Consider filling your home with the scent of these pumpkin muffins and I promise everyone will come running!  You can use them as a bribe to get everyone to sit down around the table for five minutes with a glass of milk and share about their day.  Some sweet friends of ours, who raised five wonderful human beings, suggested the following strategy to get your kids talking about their day.  Just ask them to tell you the best thing that happened to them today and the worst thing that happened.  Move around the table until everyone has a turn.  You'll be surprised at what you learn!

Happy Eating and Happy Sharing!


I bet you can eat all three!


Pumpkin Streusel Muffins

Muffins
3 cups sugar
1 cup oil
3 eggs
1/4 cup molasses
1 teaspoon vanilla
2 cups pumpkin puree (NOT pumpkin pie filling)
3 cups flour
1/2 tsp salt
1/2 tsp baking powder
1 tsp baking soda
1 tsp cinnamon
1 tsp nutmeg
1 tsp pumpkin pie spice

Streusel Topping
1/2 cup packed brown sugar
1/4 cup all-purpose flour
1 teaspoon cinnamon
4 tablespoons chilled butter, cut into small pieces

Preheat the oven to 350 degrees F. Line one 12 cup muffin tin with 12 foil cupcake liners and another muffin tin with 6 foil cupcake liners.  In a medium bowl, sift together flour, salt, baking powder, baking soda, spices and set aside.


In a large mixing bowl, combine oil, sugar and eggs. Beat with a whisk until creamy. Add the pumpkin puree, molasses and vanilla.  Continue beating until thoroughly mixed. Slowly sift the flour mixture into the pumpkin mixture, whisking just until incorporated. Do not overmix the batter. Pour batter into the line muffin cups filling each one 3/4 full.

To prepare streusel, combine brown sugar, 1/4 cup flour and teaspoon of cinnamon.  Cut in butter with a pastry blender or 2 knives until mixture resembles coarse meal.  Sprinkle the streusel evenly over all 18 cups.

Bake at 350 degrees for 25-30 minutes or until the tops of the muffins are firm to the touch.  A toothpick inserted in the center of bread should come out clean.  Makes 18 muffins.

Thursday, September 16, 2010

My Biscuit Quest: Cheddar Buttermilk Biscuits

Cheddar Biscuits hot out of the oven.


As fall aproaches, we are able to enjoy warm comfort food like soups, stews and chowders.  We want something warm in our hands and in our bellies.  Most of these are a complete dinner in a bowl, but I am always trying to think up sides to go with them.  I still like to serves salads and fresh vegetables in the winter months and the kids love it if I make homemade biscuits or rolls. 

Last year I went on a biscuit "quest" hunting far and wide for the best biscuits I could find.  I tried every recipe I could get my hands on (hence the reason Ma and Pa Walls had to go on a diet the following spring).  But it was all for a good cause, to find the perfect biscuit and share them with you!  OK, maybe I was a little selfish and wanted to have the perfect biscuit too. 

As you probably know, there are different types of biscuits.  One type uses baking powder to make them rise, another uses yeast as the leavening and there are even drop biscuits that require a sticky dough that can be baked or fried.  Yeast biscuits take a little longer to make than other types of biscuits.  I know, some people hear the word "yeast" and freak out!  "I can't make homemade bread!"  But it's really not as hard as you would think.  In fact, yeast biscuits are a good place to start if you are new to baking breads. 

Before my biscuit expedition began, my "go-to" recipe was actually derived from a scone recipe I recieved years and years ago.  I still love this recipe and use it all the time. In fact, my first discovery was I realized I had a great recipe for the "baking soda" biscuits.  I can make them sweet like scones or savory like the recipe I am about to post.  This recipe uses baking powder as it's leavening. 

Second, I found a couple of GREAT yeast biscuit recipes that are so good it will make you want to cry.  Not cry, boo-hoo, cry with joy!  So, I have to admit, side by side, I migth choose a yeast biscuit over the others.  Yeast biscuits are the ones that melt in your mouth when you eat them.  But, it's really not fair to compare the two.  Each biscuit is a unique creation and can be enjoyed for it's own yummy properties.  So, though I will post a recipe for yeast biscuits later, today I am starting with my old stand-by. 

These cheddar biscuits are crumbly and deliciously crunchy on the outside but moist and steaming on the inside when they come out of the oven.  They would go great with corn chowder or stew.  Today I will pass along my Cheddar Buttermilk Biscuits recipe in hopes that you will begin your own biscuit journey!


I cut these into rectangles, but usually I make a large circle and cut them into wedges.


Cheddar Buttermilk Biscuits

2 cups flour
1 Tablespoon baking powder
1/2 teaspoon salt
1 cup grated sharp Wisconsin cheddar cheese
6 Tablespoons butter, cold and cut into small pieces
1/2 cup buttermilk
Lightly beaten egg with 1 Tablesoon water

Preheat oven to 425 degrees Farenheit.  In a medium bowl, mix together the flour, baking powder, salt and cheese.  Cut in the butter with a mixer or a fork, until the dough is crumbly and the butter is the size of small peas.  Make a well in the center of the flour mixture and pour in the buttermilk.  Mix only until roughly combined.


Dump the dough onto a floured surface and shape into a round disc. Roll into a small circle about the size of a pie plate.  Using a sharp knife, cut the dough into wedges like you would a pie.  Transfer the wedges to a lightly greased baking sheet.  Brush the tops of the biscuits with egg wash.  Bake in the oven for 12-15 minutes or until the tops are golden.

Monday, September 13, 2010

S'more Recipes!


If you remember, in August I posted a yummy recipe for S'more cupcakes from Rebecca Rather's Parties cookbook.  They were delicious but a little time consuming to make.  I started wondering if you could make a short cut version, something that tasted just as good but much quicker to make with ingredients you are likely to have on hand in the pantry.  Voila... my creation is brownie s'mores!  Easy to make and everyone will love them.  I promise.  In fact, I had to get them out of the house and fast, so I took them to work!

Do you like s'mores?  Try these brownies. 


Super Quick Brownie S'mores

For the Crust:
3 cups graham cracker crumbs
1/2 cup sugar
1 1/2 sticks butter, melted

For the Brownies:
2 packages of Ghiradelli's Double Chocolate brownie mix 
1 small jar marshmallow cream
2 cups mini marshmallows
1 cup chocolate chips

Preheat oven to 350 degrees F.  Mix graham cracker crumbs, sugar, and melted butter until well blended . Press mixture into a 9X 13 inch baking dish.

In a separate bowl, mix both brownie mixes according to directions on package.  Pour them both over the top of the graham cracker crust.  Bake according to directions for the brownies.  I found that it took about the same time as it would without the crust.  When the brownie are set in the middle, remove from oven.  Let cool for 5 minutes.

Carefully scoop out the marshmallow cream and drop on top of the brownies.  Wait a minute or two for the marshmallow cream to get soft before spreading over the brownies.  Top with mini marshmallows.  Turn oven to broil, return brownies to oven, watching VERY CAREFULLY, and remove when mini marshmallows are lightly toasted.  Remember, the tops of the marshmallows can burn very quickly, so keep your eye on them.  Remove from oven.  Wait 5 minutes, sprinkle with chocolate chips.  Allow to cool (if you can).  Devour!

Thursday, September 9, 2010

Roasted Butternut Squash Soup with Ravioli

Roasted Butternut Squash Soup with Ravioli


When Fall arrives, I always  dig out the recipes that are buried behind the summer ones that use up the wonderful bounty of summer vegetables like tomatoes and corn.  But Autumn brings a whole new spectrum of produce to enjoy, and makes it difficult for me to decide which to try first.  I pull out recipes, cookbooks and old magazines for inspiration.

I can never resist buying magazines in Fall because the photographs always look so cozy.  Autumn colors are my favorites and the recipes are always warm and comforting.  You want to curl up by the fire and enjoy some hot cider or a bowl of steaming soup.  All the delicious squashes like butternut, acorn and even pumpkin are in season and highlighted in the cooking magazines.  These are great to eat roasted or in soups.  I have memories of our family eating my mother's acorn squash, baked with butter and brown sugar.  What kid wouldn't like that?  I realized though, that I never make it for my own children.  I think because we are exposed to a host of international foods now, we tend to make dinners that include a larger variety.  For example, my kids like Greek, Mexican and Italian cuisine.  The yummy acorn squash recipe became one of those lost and forgotten dishes that needs to be rediscovered.

Today's recipe is for a yummy Roasted Butternut Squash Soup and Ravioli.  I chose "Whole Wheat Chicken and Prosciutto Ravioli."  For a vegetarian option, use cheese ravioli.  I like this recipe because it calls for organic vegetable broth instead of chicken broth, which gives the soup a unique taste, layering the flavors of many vegetables with the squash.


Pretty squash, neatly cut.  YEAH!


One little detail:  it is nearly impossible to peel a butternut squash.  SERIOUSLY!  If you notice, they never show a chef hacking into that thing on the cooking shows.  They either show it peeled or cut in nice and neat little squares.  "They" say you can use a peeler but I've gone through two trying it.  Your best bet is to have a very sharp knife and peel it slowly, close to the edge, as you would a cantaloupe.  It's just a little bit harder than a cantaloupe.  The first time I fought with a butternut squash, I lost.  So, don't give up.  It is so good and yummy roasted, on top of a salad or in soup.


Roasted Butternut Squash Soup with Ravioli

1 medium large butternut squash
32 ounces Organic vegetable broth
1/2 cup water
1/2 stick butter
1/2 teaspoon kosher salt
1/4 teaspoon ground red pepper
1 package of Whole Wheat Chicken Prosciutto Ravioli  (Cheese Ravioli is a vegetarian option)
2 Tablespoons molasses
2 tablespoons olive oil
Parmesan Cheese, grated

Squash drizzled with olive oil and molasses, ready for roasting.

Peel squash.  Halve lengthwise.  Remove seeds and discard.  Cut squash into 1 inch pieces.  Heat oven to 400 degrees F. Layer squash on a cookie sheet.  Drizzle with the olive oil and molasses. Bake, uncovered until tender, about 35 minutes. Cool slightly.

Puree vegetables and vegetable broth in a blender, in batches if necessary, until smooth. In saucepan, combine pureed squash and water. Bring to a boil. Serve topped with the raviolis and grated Parmesan cheese.

Sunday, September 5, 2010

5 Recipes for Puff Pastry: #5 Tarts- Honey Drizzled Fig & Gorgonzola Cheese/ Mediterranean

Honey Drizzled Fig and Gorgonzola Cheese Tart


All week long we've been enjoying delicious recipes that use the versatile freezer staple, puff pastry.  In celebration of the creation of this light and flaky pastry, I have included a bonus recipe for our final day.  I have included two different types of tarts that will make great appetizers or can be enjoyed as a light lunch.  I just invented these two recipes myself based on ingredients that I like and other recipes in my file.  We love to make Greek style pizzas with flat bread, so I used similar ingredients on the Mediterranean tart, for a richer, fuller dish.

A long time ago, I copied down a fig tart recipe that used goat cheese, but I like the sharp flavor of Gorgonzola which I think complements the sweet figs.  You can be creative and try out a multitude of variations with the basic recipe.  Tomato, basil and mozzarella drizzled with garlic-infused olive oil would be delicious.  Or prosciutto, roasted red peppers and Swiss cheese with a splash of balsamic vinaigrette.  The point of having a freezer staple is that you can pull it out at the last minute and use whatever ingredients you have on hand to whip up something wonderful.  Be brave...you can always try out a few ideas on the family before the company arrives.  Once you're convinced everything is great you can file the recipe away for a rainy day or unexpected visitor.

There are plenty of recipes to be found on puffpastry.com, I just gave a few of my favorites.  I hope you enjoy them as much as my family!


Puff pastry scored, pierced with a fork and ready for the oven.


PLEASE NOTE:  For the purpose of this post (and the size of my family) I cut one sheet of puff pastry in half and made two smaller tarts.  The recipes actually use an entire sheet of puff pastry for one large tart.


Try out this recipe now while figs are at their peak.


Honey Drizzled Fig and Gorgonzola Cheese Tart

1 Sheet Frozen puff pastry sheet, thawed
3-4 figs, stems removed, cut in half and sliced into thin wedges
2/3 cup Fig preserves
4-5 oz (1 small container) gorgonzola cheese
2 Tbsp Honey

Preheat oven to 400°. On a baking sheet lined with parchment paper, unfold pastry sheet and gently flatten seams. Score a 1/2 inch border around the pastry with a knife.  Prick all over the inside of the rectangle with a fork. Place in oven for 15 minutes or until pastry is golden brown.  Remove from oven.

Spread the fig preserves evenly over the tart to within 1/2 inch of the edge, top with crumbles of gorgonzola, and sprinkle fig slices. Return to the oven and bake 5-7 minutes until goat cheese begins to melt. Allow to cool for about 5 minutes, drizzle with honey and serve warm.


Mediterranean tart topped with olives, feta cheese, artichokes and tomatoes.


Mediterranean Tart


1 Sheet Frozen puff pastry sheet, thawed
2 small tomatoes, chopped
1/2 cup mixed green and black olives, pitted
1/2 cup artichoke hearts, cut into small pieces
4-5 oz (1 small container) feta cheese
2 Tbsp Meditteranean Garlic Olive Oil (any flavored dipping oil works)

Preheat oven to 400°. On a baking sheet lined with parchment paper, unfold pastry sheet and gently flatten seams. Score a 1/2 inch border around the pastry with a knife. Prick all over the inside of the rectangle with a fork. Place in oven for 15 minutes or until pastry is golden brown. Remove from oven.

Cover the tart to within 1/2 inch of the edge with the toppings including tomatoes, olives, artochoke hearts and crumbled feta cheese.  Return to the oven and bake 5-7 minutes until feta begins to melt. Allow to cool for about 5 minutes, drizzle with Mediterranean Garlic olive oil.


Saturday, September 4, 2010

5 Recipes for Puff Pastry: #4 Sticky Buns

Warm sticky buns smell like caramel and cinnamon.


Our fourth recipe this week is a popular one for puff pastry but I had to include it in the list.  These warm sticky buns remind me of the monkey bread my mom use to make when we were kids.  These are quick to make in the morning and taste insanely good....gooey, buttery...and smell like caramel and cinnamon when they come out of the oven.  Great for the Fall!


The rolled buns sitting on top of the butter mixture, ready for baking.


Sticky Buns

12 tablespoons (1 1/2 sticks) unsalted butter, at room temperature
1/3 cup light brown sugar, lightly packed
1/2 cup pecans, chopped in very large pieces
1 package (17.3-ounces/ 2-sheets) frozen puff pastry, defrosted

For the filling:
2 tablespoons unsalted butter, melted and cooled
2/3 cup light brown sugar, lightly packed
3 teaspoons ground cinnamon
1 cup raisins


Preheat the oven to 375 degrees F. Place a 12-cup standard muffin tin on a sheet pan lined with parchment paper.

In a bowl, combine the 12 tablespoons butter and 1/3 cup brown sugar. Place 1 rounded tablespoon of the mixture in each of the 12 muffin cups. Distribute the pecans evenly among the 12 muffin cups on top of the butter and sugar mixture.

Lightly flour a wooden board or stone surface. Unfold 1 sheet of puff pastry with the folds going left to right. Brush the whole sheet with the melted butter. Sprinkle each sheet with 1/3 cup of the brown sugar, 1 1/2 teaspoons of the cinnamon, and 1/2 cup of the raisins. Starting with the end nearest you, roll the pastry up snugly like a jelly roll around the filling, finishing the roll with the seam side down. Slice the roll in 6 equal pieces, each about 1 1/2 inches wide. Place each piece, spiral side up, in 6 of the muffin cups. Repeat with the second sheet of puff pastry to make 12 sticky buns.


Bake for 25 minutes, until the sticky buns are golden to dark brown on top and firm to the touch. Be careful - they're hot! Allow to cool for 3-5 minutes only, invert the buns onto the parchment paper (ease the filling and pecans out onto the buns with a spoon) and cool completely.

Thursday, September 2, 2010

5 Recipes for Puff Pastry: #3 Chicken and Broccoli Purses

Chicken and Broccoli Purses


So far this week, we've enjoyed cheese straws as an appetizer, cinnamon palmiers for an afternoon snack and now it's time to try this extraordinary pastry for dinner.  Our third recipe is based on a recipe of my mom's that I have made for years, Chicken Divan Crepes.  Of course, the crepe version is delicious but it can be time consuming to make crepes.  We are one of those odd households that makes a lot of crepes, thanks to my twelve year old son's passion for dessert crepes.  Oh well, recipes for another day, I suppose.  Anyway, for the rest of the world, crepes may be impractical to make on a week night when football practice, piano lessons and other after school activites keep you running around all night.  Instead of stopping at McDonald's, come home and grab the puff pastry out of the fridge.  If it is still in the freezer, lay it out on the counter.  You would be surprised how fast in defrosts, once you are able to lay it out flat.  You can even make the filling ahead and keep it refrigerated, then assemble them right before baking.  Add a salad and fifteen minutes later you have a delicious and filling meal.


Chicken and Broccoli Purses

1/2 package of Puff Pastry(1 sheet)
1 can of Fat Free Cream of Chicken Soup
1/3 cup grated Parmesan cheese
1 Tablespoon of Worcestershire sauce
1 1/2 cups cooked chicken, cubed
1 cup chopped broccoli
Parmesan for Topping

Heat the oven to 350°F. Unfold the pastry on a lightly floured surface. Roll the pastry sheet into a 10x14-inch rectangle. Cut the pastry sheet into 4 squares. Press the pastry squares into extra large muffin-pan cups.


In a medium size bowl, add the cubed chicken, soup, Parmesan cheese  Worcestershire sauce and broccoli.  Mix well.  Pour the soup mixture into each pastry purse, dividing evenly between each one.
Bake for 15 minutes, remove and sprinkle each one with additional Parmesan cheese and return for another 2 minutes or until golden and bubbly on top.

Wednesday, September 1, 2010

5 Recipes for Puff Pastry: #2 Cinnamon Palmiers

Cinnamon Palmiers and Coffee


As promised, recipe #2 for Puff Pastry is...drum roll please...cinnamon palmiers.  These French palmiers, or elephant ear cookies, are easy to make, taste delicious and look beautiful.  Everyone will think you've been slaving away in the kitchen all day.  I can't keep them in the house, everyone devours them quickly and poof- they're gone.  These are great with coffee and make a nice treat for an afternoon snack.  Enjoy!


Cinnamon Palmiers
1/3 cup sugar
1/2 tsp. ground cinnamon
2 Tbs butter, melted
1 package frozen Pepperidge Farm puff pastry, defrosted


Cinnamon and Sugar Mixture


In a small bowl, stir together the sugar and cinnamon. Sprinkle a work surface with about 1 Tablespoon of the cinnamon-sugar. Open the sheet of pastry atop the sugar and roll it out into a rectangle about 9 by 11 inches and 1/8 inch thick. Brush the pastry with the melted butter and sprinkle with remaining cinnamon sugar mixture.


Gently roll both long ends of pastry inward so they meet in the center. Roll the outside in more cinnamon-sugar to coat. Refrigerate for 30 minutes.

Puff pastry rolled up and folded inward like a book.


Preheat an oven to 350°F. Grease 2 cookie sheets with cooking spray. Using a sharp knife, cut the pastry strips crosswise into slices 1/2 inch thick. Arrange the slices on the prepared cookie sheets, loosening the coil of each cookie slightly and spacing them about 2 inches apart.

Bake until the bottoms caramelize, about 15 minutes.  Transfer the cookies to wire racks to cool. Store in an airtight container at room temperature for up to 5 days. Makes about 24 cookies.